DIY Christmas Gift: Decorative Mason Jar Lid Wreaths
The Christmas season is upon us, and and then is our budget number-crunching. If you're looking for an inexpensive DIY Christmas gift idea, look no farther. These handmade mason jar hat wreaths are easy to make, customizable for that special someone (or family unit) in your life, and simplistically beautiful. Requite i wreath abroad or brand an entire set to give away; the possibilities for gift-giving with this idea are countless.
 View in gallery
  View in gallery
 Note: Although these DIY wreaths are extremely easy to make, they do take some time. And then get comfortable, go Netflix in view, and go going!
 View in gallery
 DIY Level: Beginner
Giftability: Very high, although you'll probably end up making double to go on some for yourself
 View in gallery
 Materials you'll demand for these homemade Christmas gifts:
- Mason jar lids (technically they are rings, but I'm calling them lids), any size or status
- Hot gum gun + sticks
- Line-fishing line
- Diverse wrapping materials, such every bit: yarn, twine, cord, thread, etc.
How to reuse the Bricklayer jar lids and apply them equally Christmas Gifts:
 View in gallery
 Step i: Attach the hook
Before you showtime wrapping your mason jar lid, you'll want to ready and attach a line-fishing line loop to serve as the wreath'southward hook. Loop and tie a knot in the fishing line so the loop is about 2" tall, or whatever length feels skillful to y'all.
 View in gallery
 Stride 2: Add glue
Next, stick a small-scale dab of glue on the outside border of your lid, and place the knot there. Spread the line-fishing line ends out in opposite directions so they line upwards with the lid edges. Concur it until information technology'south secure, merely a few seconds.
 View in gallery
 Lay a thin line of hot glue downward the sides of your chapeau to concur the fishing line ends in identify. Secure these, ane fishing line end on each side of the band.
 View in gallery
 Step iii: Kickoff to wrap
There are various ways to wrap your lids. One method I liked, because it really sandwiched the fishing line loop and kept it in identify, is as follows: hot glue the end of your string/twine/whatsoever (I'll just call it cord from here on out, no affair what y'all're using or what the photos evidence) perpendicular to the chapeau's border on the Within of the ring.
 View in gallery
 Wrap your string once around the exterior of the lid, correct next to the knot spot.
 View in gallery
 Wrap the string a second time around the lid, this fourth dimension on the other side of the knot spot.
 View in gallery
 Keep wrapping around the lid, working outward (away from the knot) from this 2d wrapping. You tin can see here that the knot is now centered betwixt two wrappings.
 View in gallery
 Step 3: Keep information technology tight
Continue to wrap your string around the lid, keeping it tight against the string before information technology. You want no space between each cord wrap, so periodically (every quaternary or fifth wrap) you might want to squeeze what you've wrapped together before moving on.
 View in gallery
 Around and effectually y'all'll go, keeping the strings tight and close together and flush with each other – don't let them cross, or it will expect sloppy. When you get all the fashion around the mason jar lid, back to the fishing line loop, it'southward time to finish information technology off. Keeping the string pulled taut, cut the string on the inside of your lid (on the edge).
 View in gallery
 Make a niggling groove between the other strings for this last scrap.
 View in gallery
 Property the string tightly, pull information technology back so y'all tin run a thin dewdrop of hot gum into that groove you but made.
 View in gallery
 Chop-chop lay the string terminate down on that sparse bead of hot glue. You can utilize something pointy, like the tip of your closed scissors, to press the string into the gum and hold it there for a few seconds until it's secure.
 View in gallery
 Done! How elementary was that?
 View in gallery
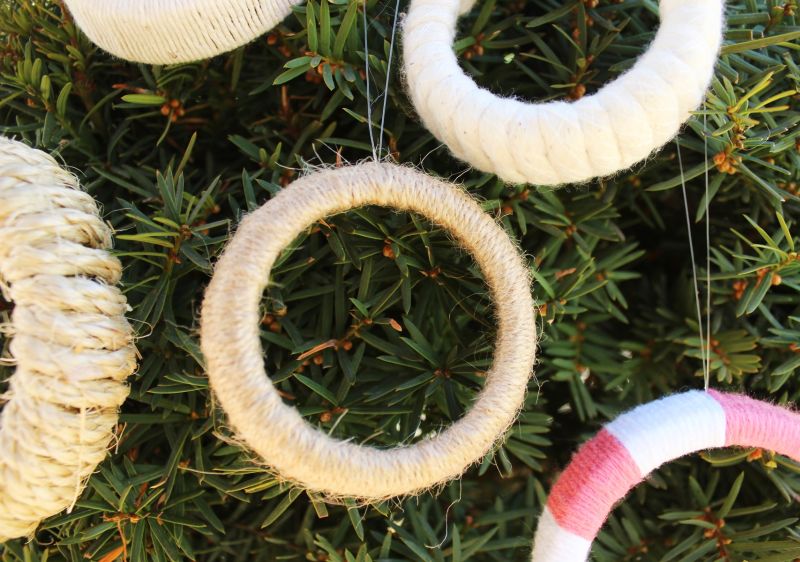
 Working with thicker and thinner "strings" each have their own benefits. This jute rope is fairly thick, and I honey the look. Thicker string means fewer wraps, which ways a faster wreath-finishing time. Still, this thicker rope is also strong, so it's a lilliputian harder to work with. The methods are the same, though, for whatsoever "string" you choose to use.
 View in gallery
 I love the textured, almost rustic look of this rope lid.
 View in gallery
 A thinner jute twine was used for this wreath, and it turned out sweet too.
 View in gallery
 Of course, you can decorate your wreaths any way you similar – add bows, glitter, leaves, any. I wanted to keep a minimal look and feel to these wreaths, and so I altered the wrapping mediums to bring variation but kept them free of actress accessories for a cleaner await.
How to make color block designs
 View in gallery
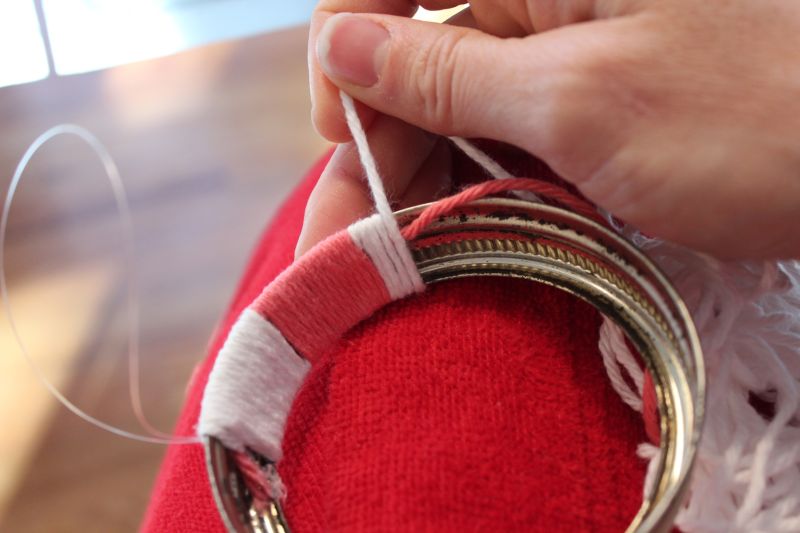
 I thought a peppermint-themed color blocked wreath would however have a warm simply gimmicky vibe, but that'south as fancy every bit I got. Hither'southward how to make a striped Christmas wreath like this one with yarn relatively efficiently.
 View in gallery
 Showtime by gluing both ends of your yarn (or however many colors of yarn you're using) perpendicular on the dorsum side of your lid, just similar you've done on the other lids.
Cull which color you desire to start with, and do 2 wraps to flank the line-fishing line loop, just like you've done before as well.
Now, keeping ColorB in place (in the groove on the inside of your mason jar chapeau), proceed wrapping ColorA equally far as you want your stripe to be. You lot should be wrapping over the ColorB strand and so it's not visible. When yous finish ColorA'due south stripe, hook information technology in one case with ColorB (which is visible but from the groove inside the lid), to kind of hold it in place.
 View in gallery
 Then begin wrapping ColorB. ColorA volition now be in the groove underneath ColorB's wrapping. Go along alternating this manner all the manner around your lid, being sure that the color not existence used for wrapping stays invisible underneath the colour that is being wrapped.
 View in gallery
 When starting time your final stripe, hook the two yarns together and go on for well-nigh three or four wraps. At this point, lay a thin line of hot gum in the groove, and attach whatever color is not being wrapped for this final stripe. Cut this yarn at the terminate of your hot gum line. Go on wrapping your final stripe color, so cease off the wreath the aforementioned manner you've finished off the others (cutting the string on the within, making a groove, laying a sparse line of hot mucilage, and securing it in place).
 View in gallery
 The peppermint striping sounds complicated, I know, but it'south pretty like shooting fish in a barrel in one case yous get the hang of it.
 View in gallery
 You're washed! You've completed a bunch of beautiful, thoughtful gifts for family and friends.
 View in gallery
 I love how these wreaths actually and truly can be customized to match any mode. Have a friend who loves sparkle? Get some metal yarn. Farmhouse? Go for jute twine or unbleached cotton string. Gimmicky? Elementary yarn in classic colors.
 View in gallery
 So many possibilities are what brand this DIY projection fun. You can actually create something special for the people you dear.
 View in gallery
 And, even meliorate, this DIY Christmas wreath project can price you nothing, if you use scraps y'all've already got on hand.
 View in gallery
 A souvenir that they'll dearest that costs nothing?!? That, my friends, is practically a Christmas miracle.
 View in gallery
 We hope yous enjoy making and giving your DIY mason jar lid wreaths!
Merry Christmas or happy gift-giving holidays in any form you choose to gloat. May you find joy in the giving.
Source: https://www.homedit.com/christmas-mason-jar-lid-wreaths/
0 Response to "DIY Christmas Gift: Decorative Mason Jar Lid Wreaths"
Post a Comment